
Rear view of tracking array - This view shows the basic structure and wiring conduits. Materials used in construction are redwood framing, anodized aluminum angle, and stainless steel bolts.
The M55 panels are all connected in parallel to work with a 12V system. The next upgrade is heavier copper power lines to the unit, to reduce the voltage drop over the 30 feet between the array and the batteries.

Tracker slew motor compartment-cover plate - The Tracker is powered by a surplus 12VDC gearmotor; this is then geared down still further and connected to the support post by a drive sprocket and chain. The array can traverse its 180 degree rotation in about 30 seconds.
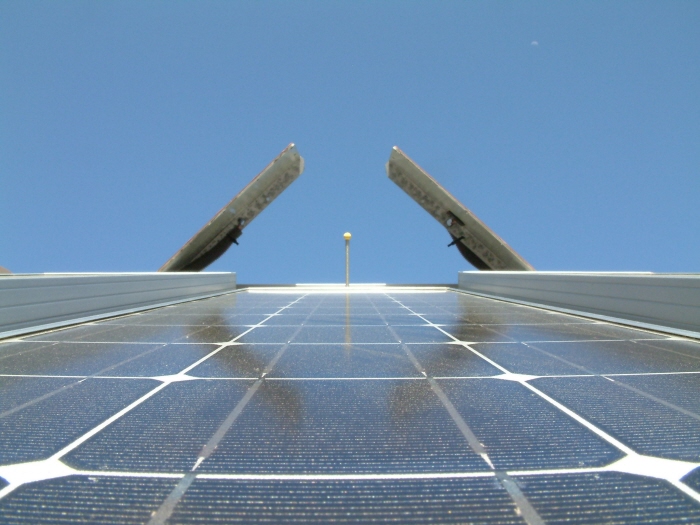
View of tracking power system - This is a view of the two tracking power panels and the alignment gnomon
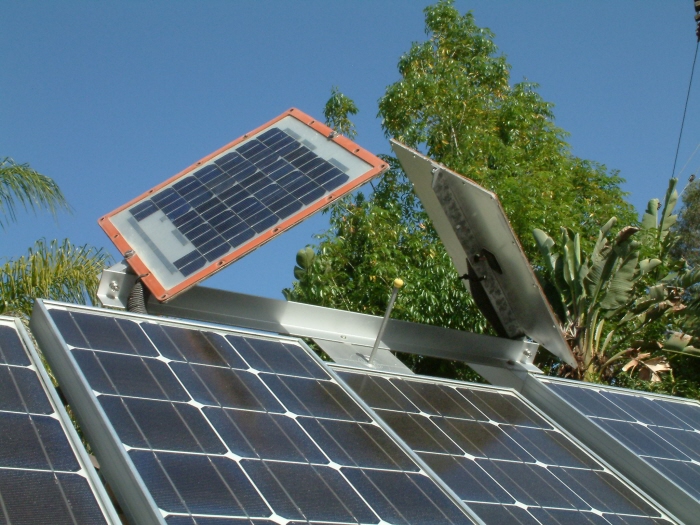
Angled PV panels for tracking system - The angled PV panels power the drive slew motor; the angled position allows the panel with the higher light level to spin the slew motor in that direction. When both panels have equal light levels, the motor stops and the array is aimed at the sun; it's simple and hard to break. The tracking alignment gnomon shows how accurate the alignment is at any time.
A second motor and drive system would allow the array to track in altitude as well, eliminating monthly angle adjustments. One day...

Solar Tracker starting its day - Solar Tracker facing east-ish.

Solar Tracker 11 AM - Keeping track...

Solar Tracker 1 PM - Tracker continues to track within a few degrees of perfect alignment--note position of gnomon shadow centered on alignment plate.

Solar Tracker--late afternoon - A tracking array can yield up to 40% more produced power over a stationary array with the same type and number of PV panels.

Luminous (solar powered) house numbers - All of the Eichler homes in my neighborhood came with the same type of address numbers on each house; they were made of plaster number castings glued on wood blocks and were in a popular modern typeface of the time (1964).
Over time, many of the numbers were damaged or just fell apart. Our numbers had been replaced with ugly Colonial brass numbers by a previous owner, so I decided to both return to the original look, and do a subtle update at the same time--numbers that glowed in the dark.

Luminous house numbers at dusk - A friend of mine in the neighborhood had made silicone molds of surviving house numbers he found and borrowed from neighbors, with an eye toward making replacements for those owners who wanted an original look. He lent me the molds to use in my luminous number project, and gave me the redwood for the mounting blocks, as well.

Luminous house numbers--full dark - I found a special (and expensive) rare-earth luminous powder that would glow a nice blue-green color, and I mixed it into a clear polyurethane casting resin; this was poured into the borrowed molds.
A special (and also expensive) non-water-base polyurethane marine varnish was used to coat the numbers to seal out all moisture, which would degrade the luminous pigment over time.
The numbers have been up for 3 years now; they glow brightly for most of the night, and are truly solar-powered.

LED retrofitted Malibu light - I decided to retrofit all of my outdoor Malibu lights with white LEDs in 2001, to save energy and to experiment with LEDs. I made 24 small circuit boards, each with an LED and a dropping resistor, which fit into the bulb sockets of the light fixtures.
I later decided to refit the lights with newer boards that used 3 LEDs per board for more light. This unit is one that uses the 3 LED module.
The system was taken off the AC grid; it is now powered entirely by solar energy.

3 LED module inside Malibu light - The changeover to LEDs from bulbs dropped the power requirement from 10 amps to .5 amps for the same amount of light. I was then able to operate the system from the 12V battery charged by the Solar Tracker. My landscape lighting has operated for almost 10 years with zero power costs.

White LED module - This warm white LED module is available from Super Bright LEDs; it can replace a 10W halogen bulb, and draws a fraction of the power. I've replaced three of my undercabinet fixture bulbs with these units, and they work great, while running MUCH cooler--a good safety point.

Primary Solar System inverters - These are the two 2500 watt SMA inverters that are the heart of our grid-tied solar system. They are designed to mount outside, but I wanted them inside for security and for monitoring purposes.
To keep them cool, a pair (for redundancy) of surplus 12VDC fans is mounted on the A system inverter.
The fans are powered directly by a 15 watt amorphous solar panel. When the sun comes up, the fans spin up and keep both inverters nice and cool.

4.5 kW roof mounted PV array - This is our roof mounted photovoltaic array. It sits several inches above the roof for improved cooling, since PV panels can be damaged by excessive heat. Aside from washing them off every month or two, the system is completely maintenance-free. We have had only one power bill since installing the system in late 2003.
gLike
Alternative Energy Projects
Energy-saving projects and gadgets that I've been working on.