
Flakpanzer Gepard super-animated R/C model tank (nickname GIZMO) - I have designed and installed multiple animation systems on this Tamiya Flakpanzer anti-aircraft tank to create a super-animated model.
The model has twin strobe tubes in the anti-aircraft cannons (with sound), variable drive speed and diesel engine sounds that track with the motor speed, self-deploying and stowing radar systems, and working head, tail, and brake lights.
The turret can slew 360 degrees at high speed, and the forward fire control radar tracks with the angle of the cannon.

Flakpanzer Gepard, turret slewed right - The Flakpanzer Gepard is a present-day German Army anti-aircraft tank designed to be used against Soviet Warsaw Pact aircraft in the event of war.
My information on the fire control systems on the real tank indicates that the system is so accurate, the first round from the cannon would punch a hole in the target, and the rest of the rounds would go through that hole. They had to spread the pattern out some to get more damage; I guess you can be TOO accurate sometimes.

Flakpanzer and 6-channel R/C transmitter - GIZMO is controlled by this 6 channel 75 mHz transmitter. The right stick controls variable speed forward and reverse drive, and left and right turning, while the left stick controls the up/down angle of the cannons, and the turret slew speed and position.
The small switch on the top left of the transmitter commands the fire control and target acquisition radar antennas to deploy or self-store. The right hand switch turns the lights on/off and fires the cannon strobes.

Flakpanzer front view, headlights on - I made the headlights and back-up lights from turned brass half-spheres, and nickel-plated them inside to give a bright white reflection of the internal bulb's light. The stock Tamiya tracks are made from hundreds of stamped metal track plates, and are pinned together with metal axles. There is also a torsion bar suspension system that works just like the real thing--I couldn't improve on it.
My Flakpanzer model was seen on Episode 165 of Modern Marvels, in a program called Models.
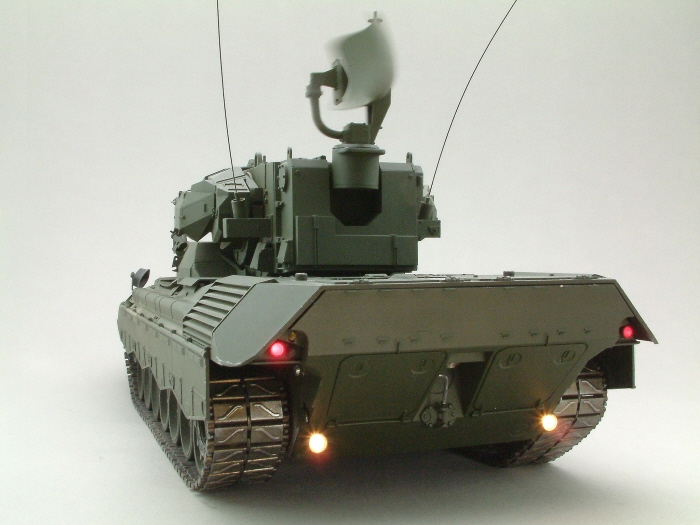
Flakpanzer rear view with lighting system on - In this view, the brake lights are on, and I've pulled back slightly on the throttle to activate the back-up lights for this shot. There are also functioning turn signals as well. The target acquisition radar is spinning; the radar also makes an electronic "beep" sound effect once per revolution.
The schematic of GIZMO's electronic systems can be found in the Working Drawings set, and more interior views of the electronic system installation are in the Electronics and Mechanisms set.

Flakpanzer Gepard model, AKA GIZMO, interior with hull removed - GIZMO is literally packed with electronics and mechanisms for the various animation and sound effect systems. The model is at the point where there is almost no more room for additional efrects to be installed.
But, I am going to install a wireless color videocamera in the Fire Control radar, as well as a pair of visible red lasers to simulate the real tank's infrared laser rangefinder. There's still a bit of space in the turret, and having telepresence on this model would be so cool...
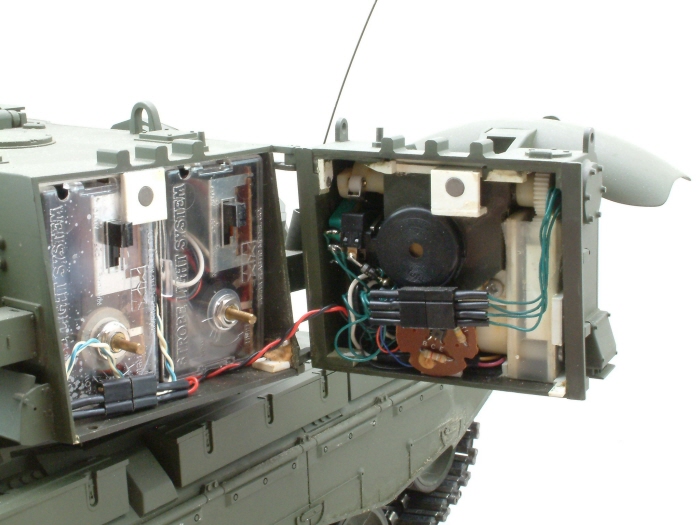
Flakpanzer Target Aquisition Radar, interior mechanism - The Target Acquisition Radar is the most complex animation mechanism on GIZMO. The system uses 2 miniature motors, a custom-built gearbox, magnetic sensors and brakes, and a relay logic system to raise, lower, and auto-stow the antenna face-down when lowering.
The antenna system ultimately took a year to design and build. It is controlled by reversing the polarity of 3 volts over a single pair of wires; the turret's umbilical cable has only 9 wires to operate all of the turret systems.

Two-sided R/C Car - Car was designed to operate when on one side or the other. It was impossible for the car to land in a position where it was "upside down", because there was no such position for this design.
The front wheel skids sideways when turning, as differential drive of the rear wheels is what actually turns the car.

The Dark Side - The other side of the car, with a very different style..

So many projects... - RC projects awaiting completion...

Cable-driven servomechanism - Cable-drive, servo-powered setup for animation system. Cable drive can solve a number of problems in certain situations, but it introduces problems of its own. If you have the space to deal with the minimum radius demands that cable makes, and the power to move it, it's a good way to go.
I like using the Goldberg braided steel, brass-plated cable sets, as they are tough, and they solder well. Holding the cable sleeve ends with special bosses, as shown here, makes operation very reliable.

Cable-driven animated horse - To take the concept of servo-operated, cable-driven mechanisms to the highest (and craziest) level I've achieved, this is an animated horse with eight servos to operate its legs.
Each leg uses two servos, one for the rotation of the entire leg at the hip joint, and one for the lower leg extension/retraction at the knee joint.
The front legs needed to rotate over 90 degrees at the hip joint, and the forelegs had to rotate at least 75 degrees at the knee joint.

Servo bank and animation electronics - Positioning eight servos in the smallest space possible required a sturdy mounting system that was also easy to disassemble for maintenance and adjustments.
The electronic package includes two six channel animation control boards operating in parallel; the #1 board has the soundtrack for the demo on its internal chip.
The board with the knob in the background is the input for controlling the motion recording of each servo. The pins on its top adjust the endpoints of the leg motion.

View of internal horse mechanism - The front legs had roughly twice the range of motion of the rear legs, and the lower foreleg moved as well--upper leg, lower leg, and ankle. The ankle motion was linked to the knee joint by a rod, so I didn't need another servo for that area.
The front legs were complex because the model had to perform a special maneuver, where it was held vertical (by its tail), and the front legs had to do a sort of rearing motion like a trained horse.
The model was built and programmed in 12 days.

Front leg mechanisms - Twin mirror-image mechanisms were used to animate the three sections of each leg. Each section was spring-loaded so the attached cable operated the motion by pulling the cable via the servo; the spring returned the mech to its starting point. Since cables usually work best in tension, the servos for these cables were extremely powerful (and expensive).
The rear legs were much simpler to animate; they didn't need anything like the front leg mechanisms.

Head/neck mech - The head moved back and forth as well--the wheels roll on the inside of the body shell under the head, since the original pivot point was removed to install the legs.
The model was designed to be held by its tail, and moved above a surface as the legs walked, trotted, or galloped. The model would NOT walk or run on its legs; it was supported by holding the tail (where the cable bundle ran through) to let the user pretend the horse was actually galloping.

Micro servo in McQueen proto - This custom-built servo was designed in an L-shape to fit into a tiny internal space; it used the gears and other parts of an existing micro servo which would not fit. My associate Steve designed the new case parts in Rhino and machined them; I installed the electronics, wiring, and feedback pot.
The custom micro servo is roughly the size of a regular postage stamp, and about a quarter-inch thick; it animates the prototype car's mouth.
gLike
Animation and Radio Control Projects