The most prominent feature is the brush holder, which sticks right out of the front like some sort of cannon/turret thing. In the spirit of linearity, the end is made just like a wrench head (this is where the brush will hang from).
Inside, a thin slot leads from the top and goes into a rectangular compartment. This is for storing used razor blades until they can all be disposed of properly.
On the back, there is a recess that the razor can stand in between uses. This allows it to dry without a risk of contamination (does it though? I'm kind of just spitballing here, but I like to think it helps).
Main overhead shot. There is a small shelf at the very top to hold brand new razor blades. At the base of the stand, a sliding tray can be pulled out to empty the used blade compartment.
Revisions have been made, and version 2 is going to be here soon! This top-view sneak peek highlights a few tweaked features, as well as some brand new ones. More updates to come.
The blade bank concept is still mostly the same, although I did adjust the tab on the sliding tray so that the gripping features would be easier to 3D print.
From the side, you can see that the blade bank is now angled to allow used blades to easily stack on top of each other. The internal features (blade slot and bank) have been brought a lot closer together to cut down on material and make better use of the inside space.
Since the razor rest was a bit shallow in this version, I thought it would be helpful to include these extra restraints to hold the razor handle down at the base. They look like some sort of prehistoric dorsal fins, making the overall aesthetic more aggressive and predatory in my opinion (reminds of something out of Jurassic Park). Not sure if they will stay for the final version, but we'll see how it works out.
Zooming out, you can see that the main features are basically the same. The razor rest on the back has a larger radius for a fit that isn't as close, and to also accommodate different sized razor handles. Over all, this version has been condensed to have a smaller footprint, taking up less space than its predecessor.
To put some context into how much smaller this version is, the shelf on the top for storing new blades is the same size as on the first version. You can sort of also tell that the brush holder has been enlarged and moved back--this should allow the brush to sit more comfortably with less risk of falling out. The increased size also accommodates larger brushes.
Got my first prototype and tested it out with all my gear. First things first, this thing is HUGE. It's probably fine for people with plenty of counter space, but for someone like me who shares a small apartment bathroom with other tenants, it does not at all fit the small form factor that I had originally wanted. Also, I don't think people typically hang their brushes by the middle of the handle as shown here, but it was surprisingly a much more stable fit this way.
This is how I imagined the brush hanging (and how I plan to keep it in the future). I noticed that this position was a bit more precarious, and the brush was prone to falling off even with just a small nudge on the wrong side.
The new blade shelf was one of the few features that perfectly did what it was intended to do. The sample box fits in there beautifully, and is very easy to remove when a new blade is needed.
The old blade slot was the second feature to work well. Here I am demonstrating the fit using a new blade. It falls right through with no interference.
The fit on the sliding tray (it's really not a tray, but I've been using that word so much that it's just stuck for now) was a bit too tight for the capabilities of the 3D printer, so it couldn't go in too far without getting stuck.
Some of the features on the tray were too small to get printed. As you can see, the word "Tray" barely comes through, and the tactile bumps meant for gripping on the tab weren't printed at all.
The razor rest fit awkwardly at best. The diameter used here was too close to the actual dimension of the razor handle, and the imperfections of the 3D print caused it to be just a *bit* too small.
With all of the changes that I was able to point out on my own, I considered the first prototype to be a resounding success! Of course, it was never meant to be perfect on the first go-around (as pretty as the first renderings were), and having a tangible product in my hand helped me find mistakes that would have been difficult to understand otherwise.
Ta-da! This is v2, the new and improved, compact version.
I will refrain from much more feature descriptions, since most of that was done through the renderings. I will point out that the light blue plastic makes the stand looks much less aggressive than before.
The tray was reworked and fits much better now. I am still considering replacing the whole current blade bank system with something else--I received many helpful suggestions and criticisms on the first version in this regard.
The "dorsal fins" on the back are growing on me the more I look at them. They do a great job of keeping the razor stable in the rest.
As you can see, it has been quite scaled down from the original.
Comparing the heights gives a more stark contrast in size. I aimed to make better use of space and material in the second version.
Back view.
First impressions are much better than its predecessor! I'll give it a couple of weeks of use before finally deciding if anything needs to be changed. More feedback is always welcome!
gLike
Personal Shave Stand

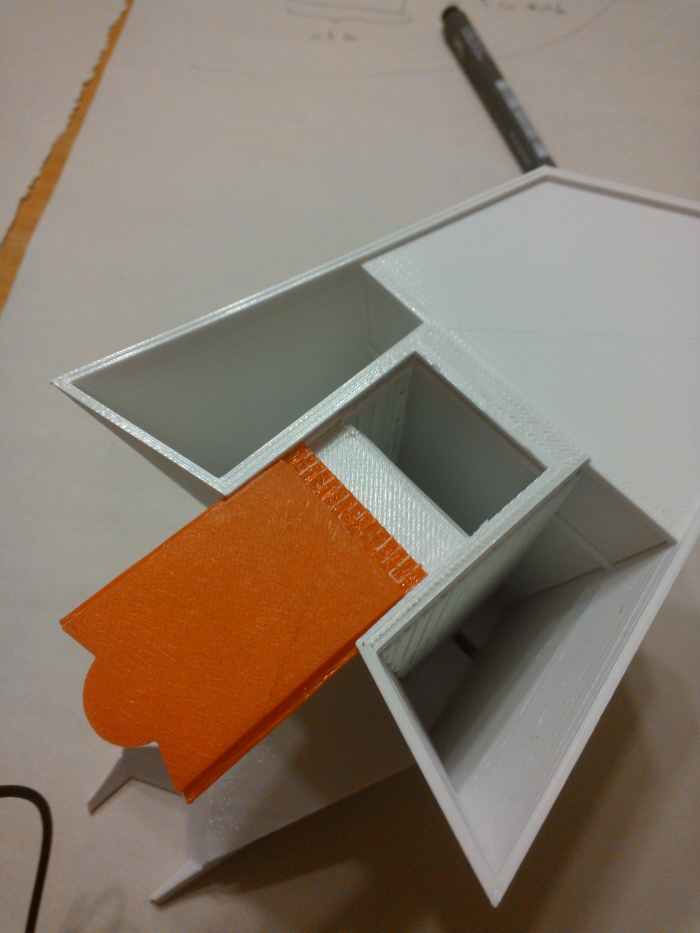
Pet project I've been mulling over this past semester. Free time over Spring Break has boiled down to this! The color isn't representative of the final product--I chose a transparent plastic to showcase the inner features, as well. The main theme of this project was to make a razor stand that stands out from what's normally found on the market today. Since shaving with DE or straight razors is a rather antiquated practice, the stands that accompany them typically share the same quality. Often, they are hand-crafted out of wood, or simply manufactured out of a few metal components. By foregoing the traditionally organic shapes and finishes in order to incorporate much more geometric forms, I was able to create a razor stand that is unique and modern. Inspiration was taken from many other razor stands, but this design was completely produced by me. Models in SW 2013 and renders in KeyShot 4.

Roi Jeric Bautista
CSWP, BS Mechanical Engineering - Design, Innovation, and Society, RPI... Houston, TX